


Recently I went about making a 3D renderer (specifically, a raytracer.) Before researching, it seemed like a daunting task, shrouded in the promise of complicated math and a variety subtle, deeply-hidden bugs. As it turns out, there is a fair amount of linear algebra, and it is hard to tell if your glass rendering is weird or if glass itself is just weird. That said, the core concepts are more accessible than I thought they would be. Having used a 3D rendering system before as an artist, I found it particularly interesting seeing how it worked from the inside, and I thought maybe the joint artist/programmer community of Newgrounds might find it interesting too.
My code examples are in Swift because that's what I used to write my renderer, but the concepts are universal. (Also, is there a way to add monospace text to a Newgrounds news post?)
What is 3D rendering, anyway?
We can think of the camera as a 2D rectangle in 3D space. It's like the film of a camera: when a photon hits this rectangle, we see its colour value in the location that it hit the film. The image we get from a camera is a 2D projection of the 3D world onto the rectangle of that piece of film.
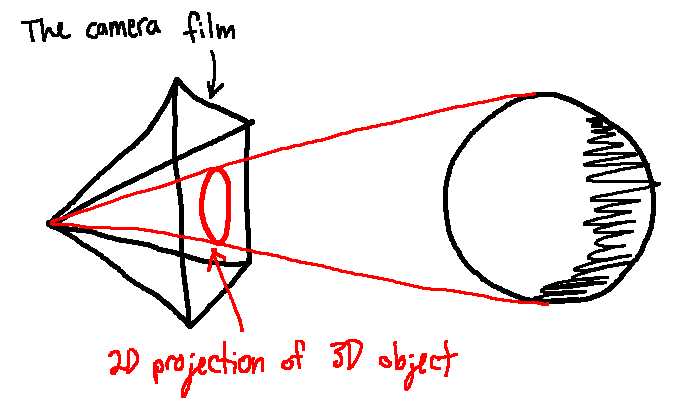
You can draw a line from a focal point behind the film to a point on an object. Where that line intersects the film is where the projection of that point in 2D will be.
The end goal of a 3D renderer is to make that 2D image of 3D space.
How does raytracing fit in?
There are plenty of ways you can write a 3D renderer. Some of them are better suited for fast render times for applications like gaming. Others, like raytracing, take longer to compute but can often model reality more realistically. Raytracing can take into account more complicated reflections of light off of other objects, soft shadows, lens blur, and more.
In real life, light is emitted from a source as a photon of a certain colour. It then will travel in a straight line (well, mostly) until it hits something. Then, one of a few things can happen to the photon. It can get reflected in a direction, its path can be bent from refraction, or it can be absorbed by the material. Some of the photons eventually bounce their way to a camera, where they are "recorded."
Raytracing models this behaviour, but in reverse. Photons are cast from the camera, and bounce around the surfaces in a scene until they hit a light source. At that point, the photon's colour is recorded. It would also work if you cast rays from light sources to the camera, like in real life, but this tends to not be as efficient since so many photons just won't reach the camera.
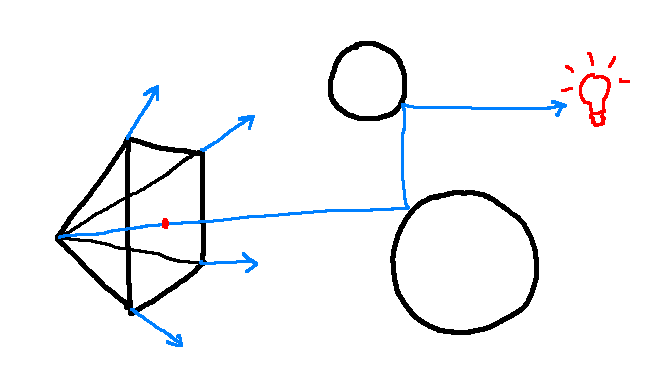
Starting from the focal point and going through a coordinate (x, y) on the film, a ray is cast, which bounces until it hits a light source to find its colour.
So, for each pixel in the image you want to render, here's what we do:
- Cast a ray of white light from a pixel
- Find the first object the ray intersects with
- If it is a light source, multiply the ray's color with the light source's colour to get the pixel colour
- Otherwise, reflect, refract or absorb the ray, and go back to step 2 with the resulting ray
Modelling geometry
Here's where some math happens. How do we determine if a ray hits an object? First, let's model a ray. A ray in 3D space can be defined as a direction vector, and a point that it goes through. Both this 3D point and vector can be represented by an (x, y, z) coordinate, but we're actually going to use a 4-vector (x, y, z, w).
Why the extra coordinate? You can certainly use a normal 3-vector, but then it's up to you to keep track of which 3-vector in your program is a point and which is a direction. If you use a 4-vector, though, w = 0 implies that it is a direction vector and w = 1 implies that it is a point, which makes things work out pretty nicely. If you add a point and a vector, their w coordinates add to 1 + 0 = 1, meaning the result is still a point. A vector minus a vector is still a vector, and 0 - 0 = 0. A point minus a point is a vector, and 1 - 1 = 0. A point plus a point doesn't make sense, which would leave you with a w value of 2, which is also unexpected. When we use transformation matrices later, they Just Work™ with this way of modelling points and vectors (for example, scaling a vector changes its size, and scaling a point does nothing.) It's convenient.
So, we've got this definition of a ray:
struct Ray {
let point, direction: Vector4
let color: Color
}
Then, for any given point on the film and focal point behind the film, we can cast an initial ray:
func castRay(from: Vector4, through: Vector4) -> Ray {
return Ray(
point: from,
direction: through - from,
color: Color(0xFFFFFF) // Start with white light
)
}
To see if it intersects with an object, we need an object to model. A sphere is a nice one, since we only need a few small pieces to represent it:
struct Sphere {
let center: Vector4
let radius: Float
}
We can then make a function pretty easily to check whether or not a ray intersects with a sphere by using the equations given in the Wikipedia article for line-sphere intersections. We can make it return an Intersection (the point of intersection and normal from the surface at that point) if it exists, or nil otherwise. If we have multiple spheres, we want the first one the ray intersects with, so you can iterate through the spheres and take the one that's the shortest distance from the ray origin. Obviously this isn't the most efficient, but works for small scenes:
struct Intersection {
let point, normal: Vector4
}
func firstIntersection(ray: Ray, spheres: [Sphere]) -> Intersection? {
return spheres.flatMap{ (sphere: Sphere) -> Intersection? in
return intersectionBetween(ray: ray, sphere: sphere)
}.sorted{ (a: Vector4, b: Vector4) -> Bool in
(a - ray.point).length < (b - ray.point).length
}.first
}
Modelling materials
Once we've found an intersection, we are tasked with bouncing the light ray. How this happens depends on the material the ray intersected with. A material, for our purposes, must be able to take an incoming ray and an intersection and return a bounced ray.
protocol Material {
func bounce(ray: Ray, intersection: Intersection) -> Ray
}
How the ray gets bounced affects what the object looks like. To make shadows, we know that some photons need to get absorbed somehow. Each time a ray is bounced, we can dim the intensity of the light of the outgoing ray a bit (for example, multiply the red, green, and blue fields by 0.7.) The more bounces the light goes through, the darker the colour becomes. If no intersection is found, we can multiply the light colour by some background colour and stop bouncing, as if there is sky in every direction as a source of photons.
If a ray does hit an object, we have to think about what direction we want to bounce the ray in. Reflective materials abide by the tenth grade science class mantra, the angle of incidence equals the angle of reflection. That is to say, if you reflect the incoming ray about the surface normal, you're going to make a mirrorlike material. If instead you choose to reflect the light in a totally random direction, you've diffused the light and mate a matte material (although, make sure you absorb the ray if it is randomly bounced into the inside of the sphere.) A surface that reflects rays but with a little bit of random variation will look like brushed or frosted metal.
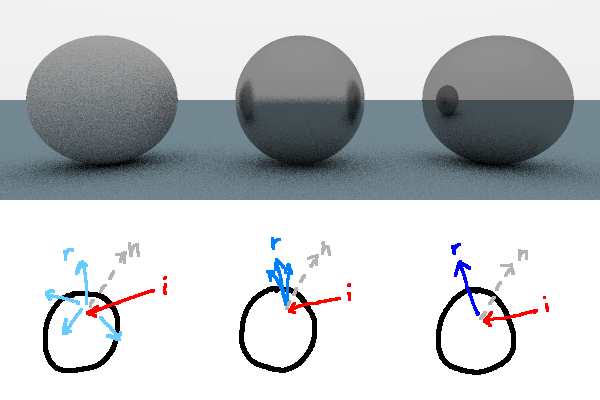
The more random variation there is in the bounced ray, the more matte the light on the material looks.
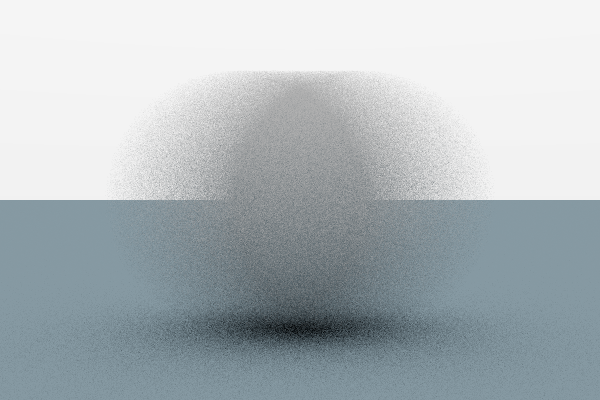
Monte Carlo rendering
You'll notice that the scene looks pretty grainy, specifically around areas that should be blurred. This is because, for each pixel, we randomly bounce a photon around. It's bound to not be quite smooth because of the random variation. To make it smoother, we can simply render each pixel multiple times and average the values. This is an example of a Monte Carlo algorithm. From Wikipedia, a Monte Carlo algorithm "uses random numbers to produce an outcome. Instead of having fixed inputs, probability distributions are assigned to some or all of the inputs." The more averaged samples we take of the image, the closer to an actual "perfect render" we get. The random grains, averaged together, end up looking like a smooth blur.
We can make more complicated materials with this sampling technique by having it, for example, reflect a photon some percent of the time and refract it the rest of the time. Having a higher probability of reflecting at steeper angles is a good way to create realistic-looking glass. You can make glossy materials by having a small probability of reflection and a higher probability of diffusing the light.
Motion blur
Another cool thing we can do using the Monte Carlo technique is create motion blur. In real life, cameras have their shutters open for a real, non-infinitesimal amount of time. The longer the film is exposed to photons, the more photons hit it, and the brighter an image you get. If an object is moving while the film is exposed, photons reflected from all points in time along the object's trajectory will end up on the film, resulting in the object appearing smeared.
We can model this in our raytracer, too. Let's say a sphere moves from point A to point B while our virtual camera shutter is open. For every ray we cast, before we check for intersections between the ray and the sphere, we pick a random point along the object's trajectory for it to be at, and use this version of the object for collisions. We use a different random location for the next ray. After doing enough samples of this, we should end up with a nice blur.
In order to actually implement this, we need to represent the object's motion. A transformation matrixworks well for this purpose. When you multiply a matrix by a vector, you get a different vector. A simple one is the translation matrix:
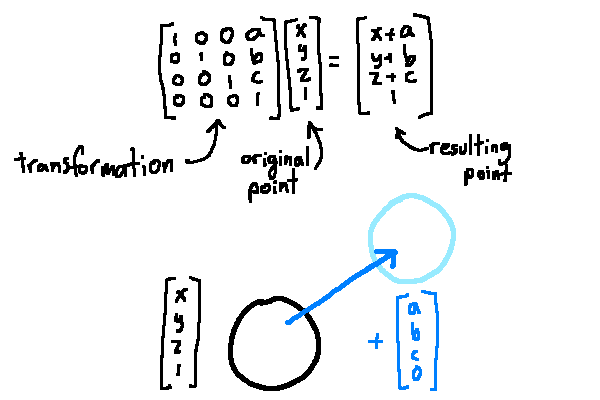
Applying a translation transformation to a point to produce a new point
The end result is a shifted coordinate. You can also create rotation, stretch, and skew matrices. By multiplying matrices together, you compose the transformations. You can invert a transformation by inverting its transformation matrix.
So, back to our motion blur. The camera shutter is open as an object moves from A to B, and we can represent A and B using transformation matrices. If you want to find a version of an object at a random point on its trajectory to check collisions with, you can interpolate between them:
func randomOnTrajectory(object: Sphere, from: Matrix4, to: Matrix4) -> Sphere { let amount = randomBetween(low: 0, high: 1) let transformation = from*amount + to*(1-amount) return Sphere( center: transformation * object.center, radius: object.radius ) }
That gives you a result like this:
A sphere moving across the x axis while the virtual shutter is open
Parallelizing
Because it takes multiple samples to get a good looking result, it would make sense to try to get as much throughput as possible while rendering. The great thing about raytracing is that each sample is calculated completely separately from other samples (there's a technical term for this, and it is, no joke, referred to as "embarassingly parallel".) You can concurrently map by running each sample in a separate thread, and when each is done, reduce by averaging them into a final result.
Going further
After implementing everything so far, there is still plenty that you can add. For example, most 3D models aren't made from spheres, so it would be helpful to be able to render polygonal meshes. By jittering the angle of each ray cast slightly, you can make a nice depth of field effect where objects closer and further from the camera than a focal lenth appear more blurred. You can try rendering gaseous volumes rather than just solids. You can subdivide the space in front of the camera so that you don't have to check collisions with every object on the screen.
The code for the raytracer I wrote is available on GitHub for reference, although it is also still a work in progress. It's incredibly rewarding to write programs like this where the feedback is so visual, so I encourage you to try it yourself too! I hope the topics I've covered so far are enough to shed light on what goes into raytracing. Pun intended, of course.
Emrox
Interesting stuff, good read!
How's code camp going anyway?
Pahgawk
Thanks! Well I'm working at Google right now for the summer before going back to school again, so that's been pretty cool. I'm doing work on Android Things, which is Android for connected internet-of-things devices. It's all new enough that there's a lot of interesting work to do still.
Also so much free food omg